In Part 2 of this series I demonstrated how to use the Shell_NotifyIconGetRect function to find the position of a notify icon. This function is new to Windows 7, however, and we must find a different solution for earlier versions of Windows.
This turns out to be quite difficult. A post on the MSDN forums by user parisisinjail provided a good starting point, and it led me to a Code Project article by Irek Zielinski that explained exactly what to do – in native code. This post shows how to implement this kind of approach in managed code.
I have verified that the following code works with Windows XP and Vista. It also works under Windows 7, but only when the icon is not located in the notification area fly-out (not found in previous versions). As such, this solution should only be used when Shell_NotifyIconGetRect is not available.
The basic idea is that the notification area is actually just a special Toolbar control, with each icon being a toolbar button. We want to find the toolbar control and loop over the buttons until we find the one that corresponds to our notify icon. We can then find the coordinates of the toolbar button. (The fly-out in Windows 7 has a separate toolbar control, so you could search that instead of using Shell_NotifyIconGetRect if you really wanted to.)
The process sounds straight forward, but the implementation is quite tricky. Read on for the code.
Step 1: Find the Notification Area Toolbar
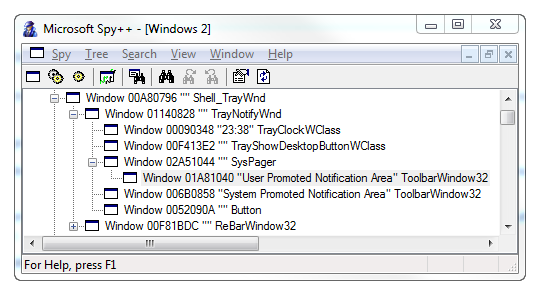
The first thing that we need to do is to find the handle of the notification area toolbar. If we open Spy++ (a tool included with Visual Studio), we can find a top-level window with the class name ‘Shell_TrayWnd’. This window represents the Windows taskbar (the notification area is a child window). While this class name is not documented anywhere as far as I can tell (meaning that it might change with a future version of Windows), it has been consistent since at least Windows XP. If we look at this window’s children, we’ll find some windows with the class name ‘ToolbarWindow32’. One of these points to the toolbar containing our notification icon.
The screenshot above is of a system running Windows 7 x64. However, the arrangement of windows underneath the Shell_TrayWnd window varies from version-to-version: it has changed from Windows XP to Vista and again from Vista to 7. Furthermore, the names of windows vary according to the system’s language, so it’s not worth searching for a window called ‘User Promoted Notification Area’ when it might be called ‘사용자 프롬프트 알림 영역’ or any number of other strings (the names also change within language between Windows versions). In other words, we must be careful when we search for the toolbar’s handle.
With that in mind, let us continue.
Find Shell_TrayWnd
We’ll use the FindWindow function to search for window with the class name ‘Shell_TrayWnd’.
|
1 2 |
[DllImport(“user32.dll”)] private static extern IntPtr FindWindow(string lpClassName, string lpWindowName); |
|
1 |
IntPtr naparenthandle = FindWindow(“Shell_TrayWnd”, null); |
Enumerate Child Windows
Given the variable nature of the child windows, it seems to me that the best approach is to find all child windows with the class name ‘ToolbarWindow32’ and search through all of them until we find our notify icon. We’ll use the EnumChildWindows function to make a list of windows. The following code is from PInvoke.net, with a minor change to make the list include only ToolbarWindow32 windows.
|
1 2 3 4 5 6 7 8 9 10 11 12 13 14 15 16 17 18 19 20 21 22 23 24 25 26 27 28 29 30 31 32 |
[DllImport(“user32”)] [return: MarshalAs(UnmanagedType.Bool)] private static extern bool EnumChildWindows(IntPtr window, EnumWindowProc callback, IntPtr i); private static List<IntPtr> GetChildWindows(IntPtr parent) { List<IntPtr> result = new List<IntPtr>(); GCHandle listHandle = GCHandle.Alloc(result); try { EnumWindowProc childProc = new EnumWindowProc(EnumToolbarWindow); EnumChildWindows(parent, childProc, GCHandle.ToIntPtr(listHandle)); } finally { if (listHandle.IsAllocated) listHandle.Free(); } return result; } private static bool EnumToolbarWindow(IntPtr handle, IntPtr pointer) { GCHandle gch = GCHandle.FromIntPtr(pointer); List<IntPtr> list = gch.Target as List<IntPtr>; if (list == null) throw new InvalidCastException(“GCHandle Target could not be cast as List<IntPtr>”); StringBuilder classname = new StringBuilder(128); GetClassName(handle, classname, classname.Capacity); if (classname.ToString() == “ToolbarWindow32”) list.Add(handle); return true; } private delegate bool EnumWindowProc(IntPtr hWnd, IntPtr parameter); |
We’ll call our GetChildWindows function using the pointer to the Shell_TrayWnd window we found earlier:
|
1 |
List<IntPtr> natoolbarwindows = GetChildWindows(naparenthandle); |
Step 2: Search Toolbars
We should now have a list with pointers to all the notification area toolbars. We’ll search through each toolbar until we find the notify icon (or run out of possibilities).
|
1 2 3 4 |
bool found = false; for (int i = 0; !found && i < natoolbarwindows.Count; i++) { IntPtr natoolbarhandle = natoolbarwindows[i]; |
We next need to determine how many buttons are on the current toolbar. We can send a TB_BUTTONCOUNT message to the toolbar to find out.
|
1 2 3 |
private static uint TB_BUTTONCOUNT = 0x418; [DllImport(“user32.dll”)] private static extern IntPtr SendMessage(IntPtr hWnd, uint Msg, IntPtr wParam, IntPtr lParam); |
|
1 |
int buttoncount = SendMessage(natoolbarhandle, TB_BUTTONCOUNT, IntPtr.Zero, IntPtr.Zero).ToInt32(); |
Now we can loop through and find data about each button. This is harder than it sounds, since it turns out that we need to allocate memory within the toolbar’s process (and copy it back afterwards) – we can’t directly use memory belonging to our application. Irek Zielinski explains it more eloquently.
The GetWindowThreadProcessId function does what its name suggests:
|
1 2 |
[DllImport(“user32.dll”)] private static extern uint GetWindowThreadProcessId(IntPtr hWnd, out uint lpdwProcessId); |
|
1 2 |
uint naprocessid; GetWindowThreadProcessId(natoolbarhandle, out naprocessid); |
Next, we’ll use the OpenProcess function to get a handle to the toolbar process:
|
1 2 3 4 5 6 7 8 9 10 11 12 13 14 15 16 |
[Flags] private enum ProcessAccessFlags : uint { All = 0x001F0FFF, Terminate = 0x00000001, CreateThread = 0x00000002, VMOperation = 0x00000008, VMRead = 0x00000010, VMWrite = 0x00000020, DupHandle = 0x00000040, SetInformation = 0x00000200, QueryInformation = 0x00000400, Synchronize = 0x00100000 } [DllImport(“kernel32.dll”)] private static extern IntPtr OpenProcess(ProcessAccessFlags dwDesiredAccess, [MarshalAs(UnmanagedType.Bool)] bool bInheritHandle, uint dwProcessId); |
|
1 |
IntPtr naprocesshandle = OpenProcess(ProcessAccessFlags.All, false, naprocessid); |
Now we allocate memory within the toolbar’s process to store the information about each button:
|
1 2 3 4 5 6 7 8 9 10 11 12 13 14 15 16 17 18 19 20 21 22 23 24 25 26 27 28 29 30 |
[Flags] public enum AllocationType { Commit = 0x1000, Reserve = 0x2000, Decommit = 0x4000, Release = 0x8000, Reset = 0x80000, Physical = 0x400000, TopDown = 0x100000, WriteWatch = 0x200000, LargePages = 0x20000000 } [Flags] public enum MemoryProtection { Execute = 0x10, ExecuteRead = 0x20, ExecuteReadWrite = 0x40, ExecuteWriteCopy = 0x80, NoAccess = 0x01, ReadOnly = 0x02, ReadWrite = 0x04, WriteCopy = 0x08, GuardModifierflag = 0x100, NoCacheModifierflag = 0x200, WriteCombineModifierflag = 0x400 } [DllImport(“kernel32.dll”)] private static extern IntPtr VirtualAllocEx(IntPtr hProcess, IntPtr lpAddress, uint dwSize, AllocationType flAllocationType, MemoryProtection flProtect); |
|
1 |
IntPtr toolbarmemoryptr = VirtualAllocEx(naprocesshandle, (IntPtr)null, (uint)Marshal.SizeOf(typeof(TBBUTTON)), AllocationType.Commit, MemoryProtection.ReadWrite); |
We allocate enough memory to store a TBBUTTON struct, though we will use the same area to store a RECT struct later (if we find the icon). Since a RECT is smaller than a TBBUTTON, this is not a problem.
We now begin our loop through each button:
|
1 2 |
for (int j = 0; !found && j < buttoncount; j++) { |
We’ll use the TB_GETBUTTON message to retrieve a TBBUTTON data structure for each button. We could alternatively use the TBBUTTONINFO structure, but it doesn’t provide us with any additional useful information in this case.
|
1 |
private static uint TB_GETBUTTON = 0x417; |
|
1 |
SendMessage(natoolbarhandle, TB_GETBUTTON, new IntPtr(j), toolbarmemoryptr); |
There should now be a populated TBBUTTON structure in the toolbar process’s memory: let’s retrieve it with ReadProcessMemory.
|
1 2 |
[DllImport(“kernel32.dll”)] private static extern bool ReadProcessMemory(IntPtr hProcess, IntPtr lpBaseAddress, out TBBUTTON lpBuffer, int dwSize, out int lpNumberOfBytesRead); |
|
1 2 |
TBBUTTON buttoninfo = new TBBUTTON(); ReadProcessMemory(naprocesshandle, toolbarmemoryptr, out buttoninfo, Marshal.SizeOf(buttoninfo), out bytesread); |
The TBBUTTON structure contains a member called ‘dwData’, which holds an ‘application-defined value’. In the case of the notification area, this happens to be a pointer to an IntPtr followed by a uint, holding the notify icon’s window handle and ID, respectively. Let’s retrieve those values. Note the overloads of ReadProcessMemory (two of several). Note also that it is important to use IntPtr, not int, since the length of the handle varies depending on whether the system is 32-bit or 64-bit.
|
1 2 3 4 |
[DllImport(“kernel32.dll”)] private static extern bool ReadProcessMemory(IntPtr hProcess, IntPtr lpBaseAddress, out IntPtr lpBuffer, int dwSize, out int lpNumberOfBytesRead); [DllImport(“kernel32.dll”)] private static extern bool ReadProcessMemory(IntPtr hProcess, IntPtr lpBaseAddress, out uint lpBuffer, int dwSize, out int lpNumberOfBytesRead); |
|
1 2 3 4 5 |
IntPtr niinfopointer = buttoninfo.dwData; IntPtr nihandlenew; ReadProcessMemory(naprocesshandle, niinfopointer, out nihandlenew, Marshal.SizeOf(typeof(IntPtr)), out bytesread); uint niidnew; ReadProcessMemory(naprocesshandle, niinfopointer + Marshal.SizeOf(typeof(IntPtr)), out niidnew, Marshal.SizeOf(typeof(uint)), out bytesread); |
Now all we need to do is check whether the current toolbar button is in fact our notify icon. (I demonstrated how to retrieve the handle and ID of a WinForms NotifyIcon in Part 2. I’ll assume those values are available here.)
|
1 2 |
if (nihandlenew == nihandle && niidnew == niid) { |
If either condition is false, we’ll just continue on with the loop(s). If, on the other hand, we’ve found the notify icon, we need to find its coordinates: on to Step 3!
TBBUTTON Struct
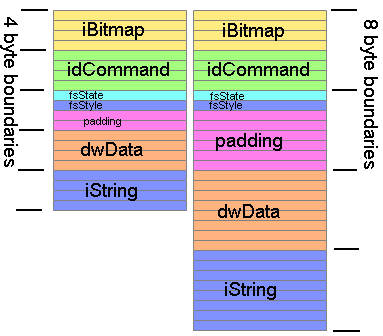
You may notice that I’ve not defined the TBBUTTON struct yet. While the structure looks simple enough in the MSDN documentation, implementing it in managed code is a bit tough as its size varies depending on whether the operating system is 32-bit of 64-bit. Julian McFarlane blogged about this two years ago. I stole this image from his blog:
As you can see, the padding is 2 bytes long under 32-bit Windows, and 6 bytes long under 64-bit Windows. Since we don’t care about fsState and fsStyle for this project, the easiest solution is to simply use three IntPtrs for fsState/fsStyle/padding, dwData and iString. This will give us the correct alignment no matter the architecture. (It would of course be possible to retrieve fsState and fsStyle later, if needs be.)
|
1 2 3 4 5 6 7 8 9 |
[StructLayout(LayoutKind.Sequential)] private struct TBBUTTON { public int iBitmap; public int idCommand; public IntPtr fsStateStylePadding; public IntPtr dwData; public IntPtr iString; } |
Step 3: Determine Button’s Coordinates
Now that we’ve determined which toolbar button corresponds to our notify icon, we just need to find its coordinates. This is made simple by the TB_GETITEMRECT message and the MapWindowPoints function.
|
1 2 3 |
[DllImport(“user32.dll”)] private static extern int MapWindowPoints(IntPtr hWndFrom, IntPtr hWndTo, ref RECT lpPoints, UInt32 cPoints); private static uint TB_GETITEMRECT = 0x41d; |
|
1 2 3 4 5 |
SendMessage(natoolbarhandle, TB_GETITEMRECT, new IntPtr(j), toolbarmemoryptr); RECT result; ReadProcessMemory(naprocesshandle, toolbarmemoryptr, out result, Marshal.SizeOf(result), out bytesread); MapWindowPoints(natoolbarhandle, (IntPtr)null, ref result, 2); found = true; |
Step 4: Clean Up
When we deal with unmanaged code, it is important to free resources when we’re done with them, otherwise we’ll start leaking memory.
|
1 2 3 4 5 6 7 8 9 10 11 |
[Flags] public enum FreeType { Decommit = 0x4000, Release = 0x8000, } [DllImport(“kernel32.dll”)] private static extern bool VirtualFreeEx(IntPtr hProcess, IntPtr lpAddress, int dwSize, FreeType dwFreeType); [DllImport(“kernel32.dll”)] [return: MarshalAs(UnmanagedType.Bool)] private static extern bool CloseHandle(IntPtr hObject); |
|
1 2 |
VirtualFreeEx(naprocesshandle, toolbarmemoryptr, 0, FreeType.Release); CloseHandle(naprocesshandle); |
As promised earlier, look out for a sample solution with all the code from this series of blog posts put together. I’ll try and publish it soon.


Leave a Reply